I spent the last week redecorating and reorganizing stuff at home and I'd like to share with you some of the stuff that I did. Who knows, you might be able to pick up a thing or two :)
a
a
Pantry labels. It all started when my friend Cia posted a photo of her labels on Facebook. I was inspired! Plus, since my labels at home are like three-years old, some of them are starting to fade already. It was really time to replace them. Thanks, Cia for the idea!
a
a
Before: handwritten on clear stickers (wala pa kasi kaming printer noon).
a
a
After: printed on white paper and "sealed" with strips of the same clear sticker that I used before (they come in A4 sizes) to make them waterproof.
a
a
Picture frames. I updated some photos by replacing the old ones and added new ones. I also rearranged them.
a
a
Before: picture frames arranged in a square-formation of sorts.
a
a
After: I added the new frames that I got from the household fair in Bitec, placed them lower and spread them farther apart. Mas ok ba?
a
a
Before: notice the blank wall on the left side by the shoe cabinet? Sorry this is the only photo that I have of the house.
a
a
a
After: I moved the smaller frames here so they will be easier to look at.
a
a
Added the newest member of the family as well -- my nephew Eli :)
a
a
Another thing worth sharing about this particular makeover is how I stuck those frames on the wall. I'm not sure if I'm allowed to drill holes on the wall and I don't have the tools for that so these became my best friends:
a
a
These 3M Command strips stick like a dream and they don't damage the surface that you stick them on.
a
a
For the heavier frames, I use these. They stick like velcro.
a
a
Color-coded chopping boards. Richard says I have too many but I told him we need separate boards to prevent cross-contamination. He doesn't quite get it so I bought these when he wasn't looking. Haha! Napailing na lang sya when I pulled these out of the bag. Heehee! Anyway, I printed out a guide to avoid confusion.
a
a
I made smaller versions of the chopping board using Powerpoint.
a
a
And placed it here where nobody will miss it.
a
a
Dust-free boxes. I also moved the contents of this rack into these clear, plastic boxes so they won't accumulate dust. Saves me from having to clean them on a regular basis too! It also makes the rack look less cluttered.
a
a
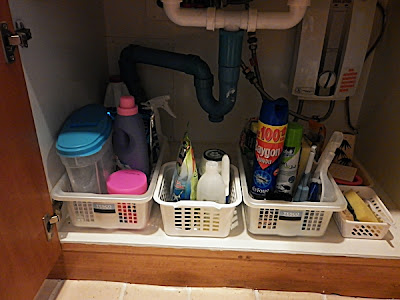
Baskets. I bought these cheap baskets from Tesco Lotus (Thb40 each/Php56) to organize the cubby under the sink. I also organized my stuff and placed similar items on the same basket -- laundry stuff, dishwashing soap, cleaning stuff, etc. Having these baskets made it look less cluttered.
a
a
Notice that I only use either white or clear bins. Same color dapat for a coordinated look. I don't like mismatched colors because I think it looks makalat. But that's just me. I'm maarte like that. What matters is these bins make your stuff look organized and uncluttered. Also, some items in the bin under the sink like the dishwashing soap have been cut open. I'm always nervous about the container tipping over and spilling so having these baskets will prevent that. It's not really just being OCD and wanting everything to look nice and neat. It's also for preventing spills and being mess free --ok, that's still being OCD. Heehee!
a
a
So there you have it! A cleaner, more organized and happier home. Hope this helps! :)


