
2007: Our first tree at our home in Sta. Rosa. Aly was so bulinggit back then.
a
a

2008: Our first tree at our home in Bangkok.
a
a

a

A small magenta tree that doesn't go with anything in the house so it totally stands out. But that's exactly how I wanted it.
a
a

2009: I added two more.
a
a

I love the vibrant colors!
a
a
This year, I added yet another one.
a
a

So we now have four: red, white, green and magenta :)
a
a
This year, I wanted to go overboard with the trimmings for a more stariray look so I added handmade decor to the store-bought ones. I also wanted the decorations to pop so I used contrasting colors. Here's a closer look:
a
a
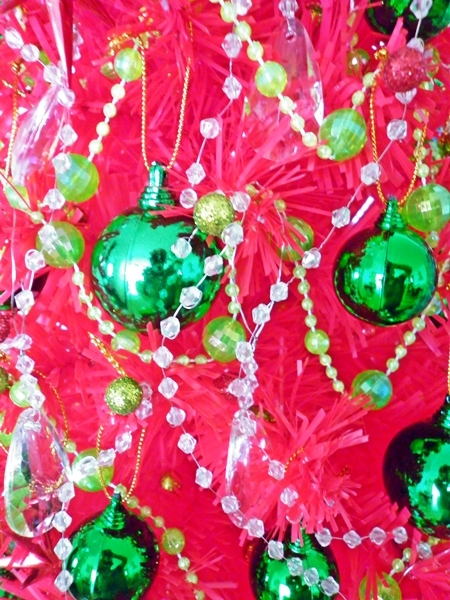
For the red tree, I used two shades of green: emerald and lime. The tree is actually a deep shade of red. I added crystals to the tree to make it sparkle. I would have wanted to make more crystal strands, but it's a lot of work and my wrists began to hurt.
a
a

I initially wanted purple (my favorite color!) for the white tree, but I didn't see a lot of purple decor so I went for two shades of blue (Richard's favorite): aqua and dark blue.
a
a

Our white tree also has crystals (which I DIY'd), small disco balls (mirror balls) and clear balls. I love this tree!
a
a

Our neon green tree has magenta and a bit of purple and white. I found an old faux pearl necklace, took it apart, strung the beads on thin wire and hung them on the tree.
a
a

The magenta tree has silver and white trimmings. The white garlands that you see are actually sold as a necklace but I thought they would look good on our tree. And those disco balls...they totally rock! I really love them. I wish I bought more. This tree has clear balls as well.
a
a

Now this red thing is a leftover of what was supposed to be a Christmas decor in itself. But, what I did was, I took them apart; cut the balls one by one and twisted them on the trees. I got them in different colors depending of the motif of the tree. It was a painstaking process that left my hands red and calloused -- in spite of using pliers. But it was all worth it and for my hardwork, I rewarded myself with a mani-pedi. Heehee!
a
a
TIPS:
a
Christmas is definitely in the house!
- Sometimes, you need not look at the household section for the perfect Christmas decor. I found some of them at the accessories section!
- And if you've got the time, making the trimmings yourself is cheaper and more rewarding than getting ready-made ones. There are tons of resources on the internet for inspiration.
- Always, ALWAYS get the little ones involved with the Christmas preps. Aly was in charge of putting the trimmings on our trees. I just made a few minor adjustments. It is, after all, for the children.
a
Christmas is definitely in the house!
No comments:
Post a Comment